Gun Cleaning How To: 4 Tools and 4 Simple Steps
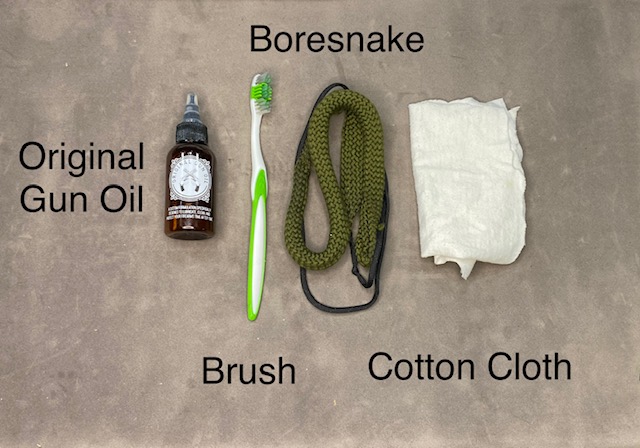
In this Gun Cleaning How To article I am going to walk you through what I consider to be the quickest and easiest way to clean a gun. Specifically I will focus on semi-automatic pistols. You will need only 4 items and perform 4 easy steps.
I will also discuss some of the different chemicals, oils and solvents that are commonly used to clean firearms and when and how to use them.
Gun Cleaning How To: Gun cleaning for beginners
Cleaning a Gun for the first time can be a daunting undertaking. This is due to the large mount of information that can be found on this topic. Some new gun owners (I was in this category many years ago) are hesitant to take the gun apart and are not sure what is needed to keep it clean and lubricated.
NEVER FEAR! I have created this “Gun Cleaning How To” in order to assist new gun owners in taking care of this important yet simple task. I promise you that once you clean your gun the first time, you will be an expert!!
Here are links to my detailed tutorials for Glock Cleaning, M&P Shield EZ Cleaning, Springfield XDm Cleaning, 1911 Cleaning and AR-15 Cleaning.
___________________________________________
Here is the CALIBER DEBATE VIDEO:
____________________________________________
Gun Cleaning How-To: Gun Cleaning in a Nutshell
Cleaning a gun is actually very simple. Once you know how, it should take less than 15 minutes.
We will VERIFY GUN IS UNLOADED, take it apart (field strip), clean each part, apply a little lubrication and put it back together.
Most modern guns have only 4 main parts. These parts are usually easy to disassemble or ‘Field strip”.
The term “Field Strip” is a gun term that simply means to disassemble the gun into its main parts so it can be cleaned, lubricated, repaired or modified without the use of tools. This is a “loose” definition as some pistols (I’m looking at you, 1911) can require a tool of some sort to remove the slide.
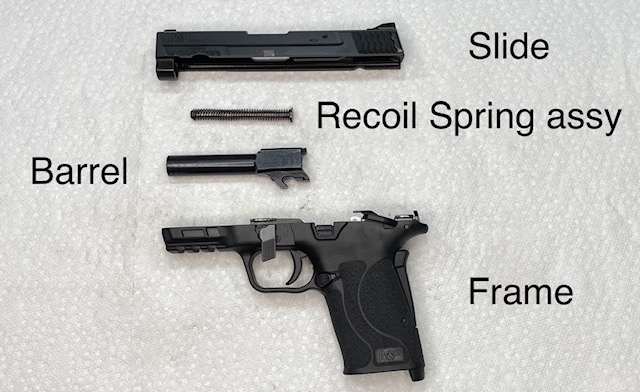
The frame and the slide are made up of many more parts, but it is not usually necessary or even advised to disassemble them further. Leave that to a gun smith or the manufacturer if you have a reason to take them apart.
Gun Cleaning How To: Where to Start
A quick Google search on the Internet will return dozens if not hundreds of results for gun cleaning that will cause the beginner to be totally confused. There are so many different gun cleaning methods, solvents, cleaning tools and products out there it can be hard to know where to start.
YOU DO NOT NEED ALL THOSE THINGS!
Rest assured that what you really need or just a few basic items to successfully perform this relatively easy and quick task.
Gun cleaning necessities
If you are a new gun owner and will be mostly shooting the gun a few times a year to get in some practice, you only need the minimum of gun cleaning supplies.
Don’t get me wrong, the hundreds of products out there all have a place and I own a lot of them myself. However, most guns can be properly maintained with the 4 items listed below.
First I’m going to list the few items that you need for a gun cleaning. Then I’ll explain how each one is used.
Here is everything most gun owners need:
- A good CLP product. CLP stands for Cleaner, Lubricant and Protectant.
- A Gun Brush (toothbrushes work great as well)
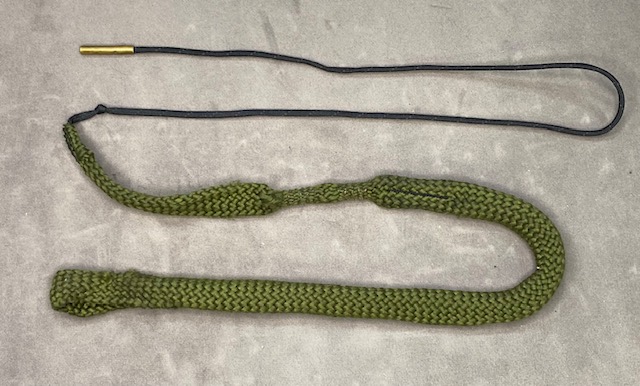
- A Boresnake
- Cotton cloth or large cotton patches.
That’s it!
The vast majority of Gun Owners do not need a fancy gun cleaning kit or several cleaners and solvents. (If you shoot a lot or, for some reason, have to clean heavily soiled or old guns, you likely need more powerful cleaning solvents and tools.)
CLP Gun Cleaner, Lubricant & Protectant
___________________________________________________
Here is the CALIBER DEBATE VIDEO:
____________________________________________________
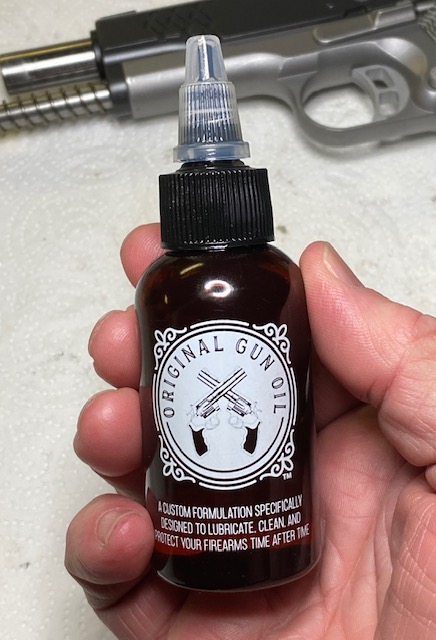
My personal choice is Original Gun Oil. This product is safe to use on all synthetic and polymer guns (Glock, Shield, Shield EZ, XD, M&P, etc), is Non-Toxic and Non-Staining. It also does not have an odor so you can use it in the house without creating that “chemical” smell. See my Original Gun Oil review here and get a 10% coupon code.
This product can be used to clean and lubricate your gun. Also, if you will be storing your gun for a period, it can help protect the finish from rust and corrosion.
Use it as a cleaner by applying it to the gun parts and wiping it off. All the grime will wipe away with the oil. Then use it as a lubricant to lubricate the appropriate areas of your gun.
The beauty of a CLP is that you do not need to wipe off every last bit of it after using it to clean the gun. This is because any leftover residue will help lubricate and protect the gun!
Gun Brush
A good gun brush is excellent to have, but a toothbrush works just as well. These are pretty cheap; you can get 10 for less than $10.
The brush will help spread the cleaning oil over the gun’s surfaces, getting it into tight spaces. Then it will be used to help push the cotton cloth into those same spaces to wipe the parts clean.
Boresnake
This is the greatest time-saver ever invented for gun cleaning! The traditional way (which works great, it’s just messy & time-consuming) to clean the inside of a gun barrel is to take oil-soaked cotton patches and push them repeatedly through the barrel with a rod until they come out clean.
The Boresnake just needs to be pulled through the barrel a couple of times, and the snug-fitting cotton material and the built-in copper brushes will take care of all the dirt & grime. You can also apply some gun oil or other solvent on the Boresnake if it is really dirty.
Use a Boresnake and save yourself 10 minutes and a mess.
Cotton Cloth
I simply use a cut up T-shirt for this. You can purchase gun cleaning cloths or cotton patches as well, but any cotton cloth will do the job.
Here are the 4 steps in cleaning a semi-automatic pistol:
The gun we will clean in this article is a Smith & Wesson M&P Shield EZ. I chose this model as it is very popular with first time Gun owners.
This article will focus on cleaning semi-automatic pistols since these are by far the most common type of firearm that is currently being purchased by New Gun Owners.
Most modern semi-automatic guns will come apart in a similar way. You may need to consult your owners manual for specific instructions.
- UNLOAD & Field Strip the gun
- Clean each part
- Lubricate the gun
- Reassemble the gun
- (Highly recommended extra step) Perform a Function & Safety Check
Step 1: UNLOAD & Field strip the pistol
Here is a Short video demonstrating this step:
To clean a semi-automatic gun properly, you will need to disassemble or field strip the firearm into its 4 basic parts:
- Frame
- Slide
- Barrel
- Recoil spring assembly
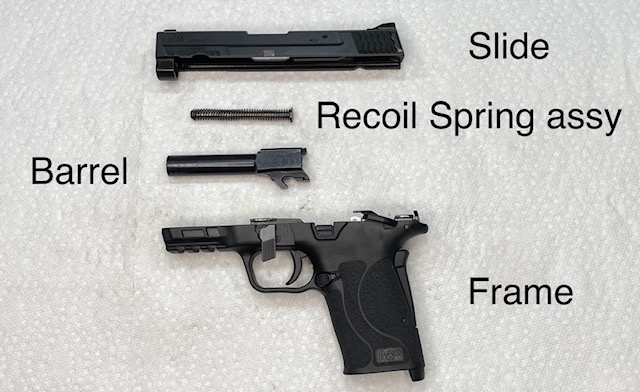
The vast majority of semi-automatic guns have these same 4 parts. Some guns such as the 1911 may have some additional small parts such as a barrel bushing and slide stop pin but these additional parts will be cleaned just the same as the rest.
Step 2. Clean each part.
Here is a video demonstrating the cleaning procedure.
This is the most time-consuming part of gun cleaning, but will not take but a few minutes to complete in most cases. I will explain how to clean each part.
Gun Cleaning How-To: Cleaning the Frame
The frame exterior should get a general wipe-down with a cotton cloth. The parts of the frame that need cleaning are shown in the picture below. Apply a few drops of Original gun Oil to each rail and any other metal part that appears dirty. Let the oil sit for a few minutes to loosen up the dirt and then wipe it all off with a cotton cloth.
Gun Cleaning How to: Cleaning the Slide
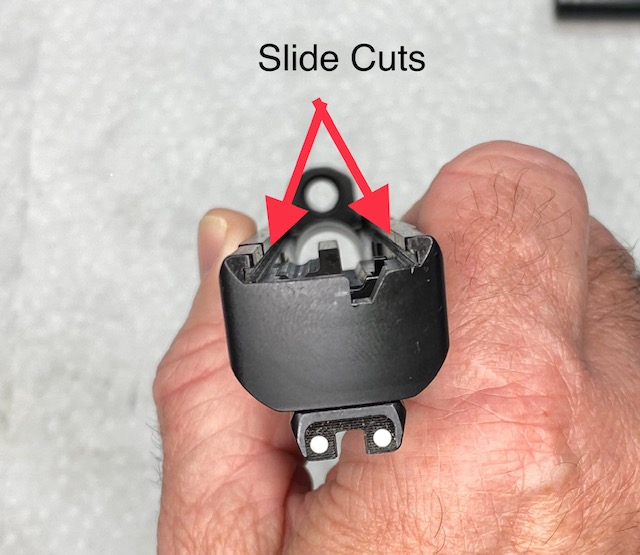
The slide exterior should also get a general wipe-down with a cotton cloth. Then apply several drops of Original Gun Oil to the interior of the slide, being careful not to get it on the firing pin opening in the breech face. Using a gun brush or toothbrush, spread the oil over all the dirty areas, especially the slide cuts that attach to the slide rails of the frame.
Let the oil work for a few minutes and then wipe it all off with a cotton cloth. Use the brush to push the cloth into the tight spaces and slide cuts to remove all the dirt thoroughly.
Gun Cleaning How to: Cleaning the Barrel
Apply Original Gun Oil to the exterior of the barrel and drip a few drops into the barrel. Let it sit a few minutes, then wipe the exterior of the barrel with a cotton cloth. Next, pull a Boresnake (proper size for your caliber) through the barrel several times until it appears clean when you look through it.
Gun Cleaning How to: Cleaning the Recoil Spring Assembly
This part usually does not get very dirty, so you can just wipe it down with a cotton cloth. Use some Original Gun Oil if it appears dirty.
You have now cleaned your gun and it is time to lubricate it.
Step 3: Lubricate the Gun
Lubricating the gun is a very important step. Fortunately, most modern guns are designed to work well with very little lubrication.
The following steps are general steps for most modern semi-automatic pistols. Each gun manufacturer has their own lubrication recommendations, so see your user manual for more inf, but this tutorial will work for all Glocks, Springfield XDs, Smith & Wesson Shield, Shield EZ, all M&P models, etc.
Gun Cleaning How to: How to Lubricate the Barrel
Apply a drop or 2 of oil to the exterior of the barrel. Spread a light coating over the entire exterior of the barrel. This will help the gun cycle as the slide moves back & forth over the barrel.
Gun Cleaning How to: Lubricate the Slide
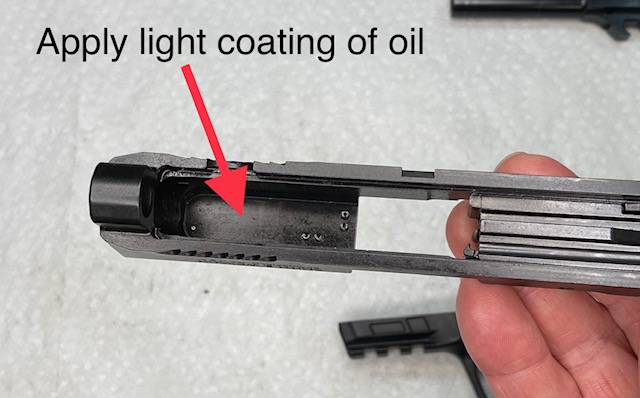
Apply a few drops of gun oil to a cotton cloth and lightly wipe the inside of the slide where it rides on the barrel.
Also, apply a drop to each slide cut where the slide rides on the frame rails. You can lube the frame rails INSTEAD of the slide cuts. The lube ends up in the same place. This is shown in the next step. Use a brush to spread the drop across the entire slide cut.
Gun Cleaning How to: Lubricate the Frame
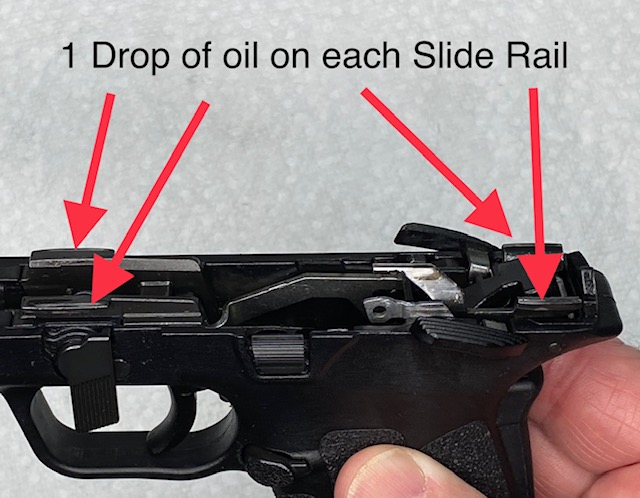
The slide rails on the frame should be lubricated; however, you do not need to lube the slide cuts in the Slide AND the rails on the Frame. You should do one or the other since they end up in the same place. The picture below shows you where the Frame Rails are located and where to lube if you did not lube the slide cuts.
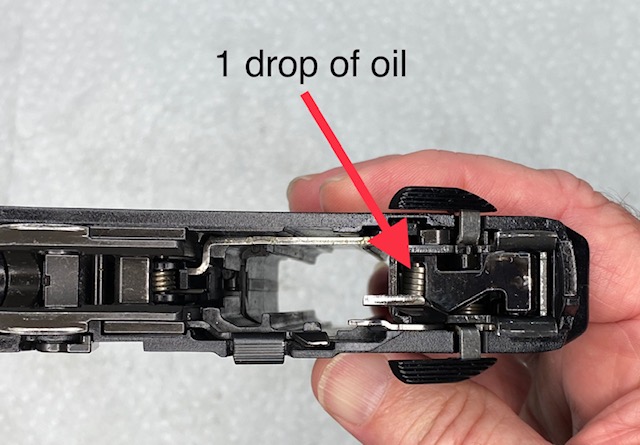
Now, one last drop of oil into the hammer/trigger area as shown in the picture below.
Step 4: Reassemble the Gun
Now that the gun parts are all clean and lubricated, it is time to reassemble the gun. The Smith & Wesson Shield EZ goes back together easily. Here is a short video that starts right at the reassembly steps.
Now that your gun is reassembled, I recommend performing a function and safety check to verify that it is correctly assembled and the gun is safe to use.
Here is a short video demonstrating the Shield EZ function and safety check. This is basically the same for most semi-automatic pistols. Your pistol may or may not have a grip safety or an external safety, so just ignore those parts if it doesn’t.
Gun cleaning How To: Cleaning your magazines.
Now that you’ve finished checking the gun, take a look at your magazines. These do not usually need cleaning very often, but if they have been dropped on the ground, you will want to disassemble them and clean them out in case dirt or gravel have gotten inside.
See these articles for details:
How to Clean an M&P Shield EZ Magazine
How to disassemble & clean a Glock Magazine
I hope this Gun Cleaning How To article has helped you in keeping your new firearm maintained! Thank you for visiting the site!
Here are some other good Gun cleaning tutorials I have found on the internet from reputable companies:
5 Steps to Proper Gun Cleaning for Handguns
How to Clean a Gun: 12 Steps (with Pictures) – wikiHow
If you have any questions or comments, please leave them in the comment section below.
My cousin is really into guns and wants to buy and collect them as soon as he gets his license in a few months. That’s why I think he’d be interested in learning how to clean a gun effectively and without a lot of tools. Thanks for the insight on gun cleaning and the importance of finding a good cleaner, lubricant, and protectant.
Eli, thanks so much for leaving the comment! Tell your cousin to check us out!
Dave
I appreciate your comment!