How to put a 1911 back together
What to do next after field stripping for cleaning, recoil spring replacement, repair or upgrade.

The 1911 is my preferred gun and I like to keep it clean. It works best when it is clean and lubricated. If you need to know how to disassemble your 1911, see my tutorial: How to disassemble a Kimber Pro Carry 1911.
1911 reassembly video is at the end of this article.
1911 Reassembly Instructions. Putting a 1911 Back together.
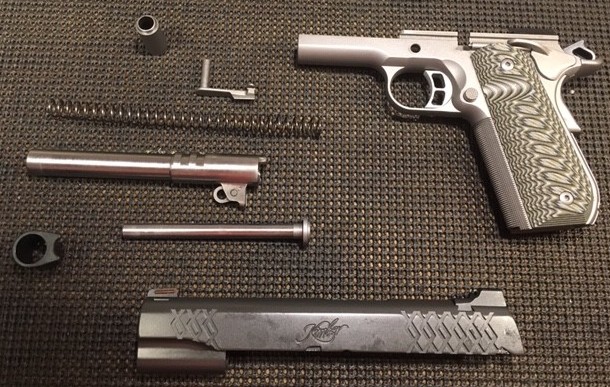
This article will show you step-by-step how to reassemble a 1911. Specifically, one with a 5″ barrel sometimes referred to as a Government Model. I am demonstrating with a Kimber Aegis Elite Custom 1911 Semi-Automatic Pistol in .45 ACP.
This procedure will work for most, if not all makes and models of 1911 pistols with a 5″ barrel and a barrel bushing.

Fortunately, this is pretty easy to do, especially after you see how it is done.
If you have strong fingers, this can be done without tools. However, you may want to have a barrel bushing wrench or a Real Avid Smart Bench Block to make it much easier.
This tutorial assumes that you have already field stripped or disassembled the gun to clean, replace the recoil spring, repair or upgrade your weapon and are ready to put the slide back on the frame.
The term Field Strip means basically removing the slide from the frame, and the removing the recoil spring, guide rod and barrel. Once this is accomplished, these components can then be cleaned and lubed as outlined in my article: Cleaning a Kimber 1911.
You can also watch my videos at the bottom of this post. The first is for the Field Strip and the second is the reassembly.
Clean, Lube, Protect
Non-Toxic
Polymer Safe
Veteran-Owned
Save 10% Use Code: “SAVEWITHDAVE“
Reassembly Steps of a 1911 5″ Government Pistol with Pictures
Place the slide upside down on your bench and slide the barrel into the slide.

Line up the barrel bushing as shown, press it into place firmly against the front of the slide.

Push the bushing into the slide as far as it will go.

Using the barrel bushing wrench, turn the bushing clockwise to the position shown. (9 o’clock position if holding the slide right-side up)

Lay the slide on the bench upside down and place the guide rod on top of the barrel as shown.

Slide the tighter, smaller end of the recoil spring onto the guide rod and seat it firmly.

While holding the barrel and guide rod in place, turn the slide sideways as shown and be sure the barrel lug is perpendicular to the barrel. Then slide it onto the frame.

Slide the assembly onto the rails of the frame until the barrel lug is lined up with the hole in the frame.

Insert the slide stop pin through the hole in the frame and leave it hang there for now.

Line up the notch in the slide with the square hole in the frame.

Line up the slide stop lever with the square hole with the small notch at the top.

** Be careful here. If you do not line things up as shown, you may scratch your gun when pressing the lever into place.
Press the lever into place by applying even pressure to both ends of the lever.

Once in place, move the slide all the way forward and lock it there with the safety lever.

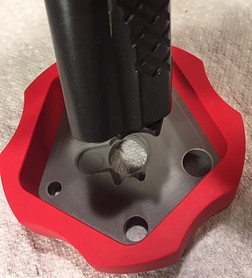
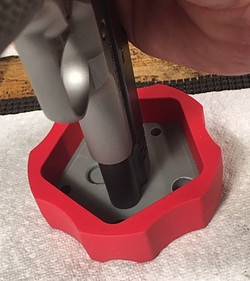
Place the Recoil Spring Plug on the End of the spring.

Press the Recoil Spring Plug into the Gun.

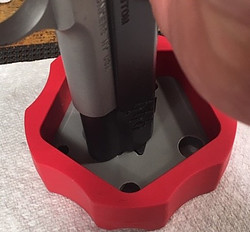
Twist the Barrel Bushing Counter Clockwise To Hold the Recoil Plug in Place.

Using Your Fingers, a Barrel Bushing Wrench or Real Avid Bench Block, press the Recoil Spring Plug Flush and move the Barrel bushing to the 6 o’clock position.
Safety and Function Checks
The gun is now reassembled. It is critical that you test the gun for safety and proper function. Please perform the 1911 Function and safety Check.
There you have it. Now you know how to put a 1911 back together. This one is a Kimber, but these steps will work with any 1911 with a barrel bushing.
If you carry a concealed weapon for self defense, have you thought about what happens AFTER you need to use deadly force to defend yourself or others? Who do you call? What do you say to the police? What DON’T you say to the police? Please read my article on Concealed Carry Insurance Coverage and Legal Protection.
This is an informative and educative post and I must commend you for taking your time to share this article you have really done a great job. This article is a must read for everyone who is in worry on how to reassemble a 1911 and I really love the way youade your explanations also backing your explanations up with pictures. This is an awesome article.
Dhayours, thank you for reading and commenting on my tutorial on how to reassemble a 1911! Hopefully it has helped you out!
Dave
Thanks for the tutorial. I just purchased a Tactical 1911G1, so this is of great help. I was a “feather merchant” in the Marines during the Korean police action, but have not handled a 45 since.
Charles, thank you for your comment. I’m glad the tutorial helped!
Dave
Thank you for your helpful instructions. I used them to reassemble my Colt 1911 pistol.
John, thanks for the comment! Enjoy your 1911!
Dave
Hello. Thank you for always good blog슬롯머신