How to take apart a Kimber 1911 .45 with a 5″ Barrel. Complete Disassembly, Takedown and Field Strip Video and Instructions
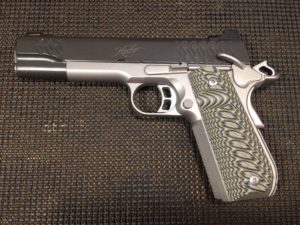
This tutorial will show you step-by-step how to disassemble, break down or Field Strip a 1911 Semi-Automatic Pistol in .45 ACP. Specifically I will be showing the disassembly of a Kimber Aegis Elite Custom 1911 in 45 ACP. Removing the slide on a 1911 is not hard once you have done it a couple times.
Kimber 4″ barrel models such as the Pro Carry II have a different take down procedure and use a different tool to remove the slide. See my article: Disassembly of a Kimber Pro Carry II. This shows the takedown of Kimber models with the 4″ bull barrel.

You are probably looking at these instructions because you have never done this before, or it has been a really long time since you have. Let me assure you that it is not complicated to take apart a Kimber or other 1911 and once you see how it is done you will remember how to do it for the next time.
Just follow my step-by-step instructions and you will be fine!

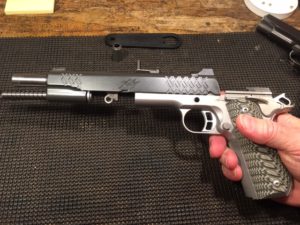
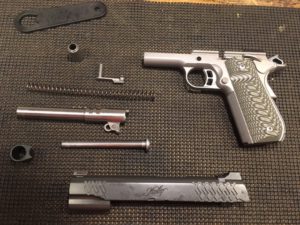
This Aegis Elite procedure will work for most 1911s with a 5″ barrel and barrel bushing as shown in the picture.
Some 5” models are called “Government” models. Some gun makers use other names for a 5″ full size 1911. Kimber calls their 5″ models “Custom”, such as Master Carry Custom.
A Pro Carry will have 4″ bull barrel, and a 3″ Barrel 1911 will be called an “Ultra Carry”. These will be addressed in another tutorial.
This procedure shows you how to take the slide off of the gun, so you can remove the guide rod, recoil spring and then the barrel for cleaning purposes.
You can also watch my video at the bottom of this post.
Disassembly of a Kimber 1911 with a Barrel Bushing
Disassembly Tools
You will likely need a Barrel Bushing Wrench for this procedure. There are some 1911 Models that will allow you to do this with your fingers, but my experience with my Kimber is that a wrench is definitely needed!
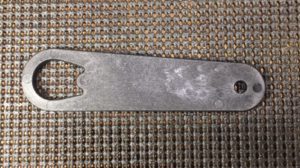
Click here to see 1911 wrenches at Amazon!!

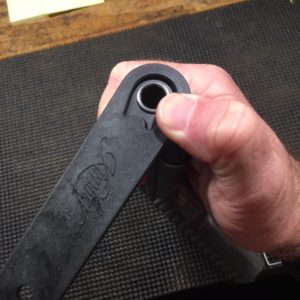
Or, a recent item I picked up called a Real Avid Smart Bench block. This helps with 1911 disassembly and reassembly in a few ways. you can check it out:
It may be possible to do this without the wrench, but it is not easy!
Disassembly Steps with Pictures
Remove any magazine that may be in the gun.
Empty the chamber to be sure there is not a round still in it.
DOUBLE CHECK THE FIREARM. BE SURE IT IS UNLOADED.
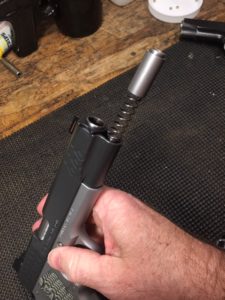
Set the gun down with the barrel pointing up. Eye protection is recommended since the recoil spring can launch the plug and potentially hit you in the face.
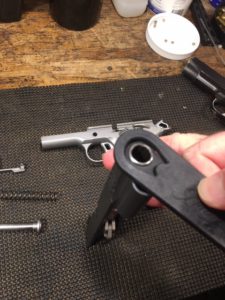
Take your barrel bushing wrench and line it up with the bushing on the gun and press down on the plug so you can turn the wrench.
Turn the wrench and bushing clockwise until the wrench is in the 9 o’clock position.
Slowly reduce pressure and carefully release downward pressure on the wrench and plug to allow plug to rise until all tension is released from the recoil spring. Be careful that the spring does not launch the plug across the room. I know this from personal experience!

Once the tension on recoil spring is removed, the slide will move easily.
Move the slide as necessary to line up the notch in the slide with the Slide lock lever as shown.
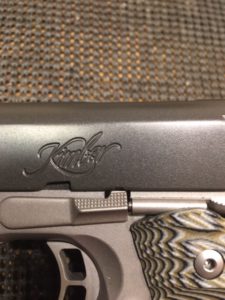
Push the slide Lock lever pin from the opposite side of the gun to start pushing it up enough to get a hold of it.
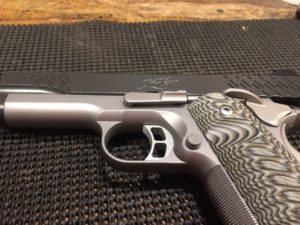
Remove the slide lock lever.
The slide can now be removed by sliding it off the front of the frame.
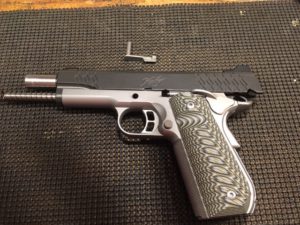
Remove the recoil spring by pulling it out the front and the guide rod by pulling it up out the back. The recoil spring may not come easily, so you may need to pull hard.
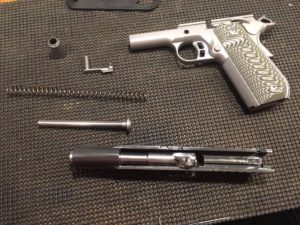
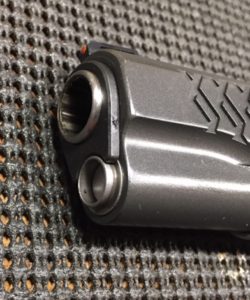
Turn the bushing counter-clockwise almost as far as it will go using the barrel bushing wrench. There is a “key way” that needs to line up with the notch in the slide in order for it to come out.
Remove the barrel bushing by pulling it out the front, wiggling it if it is tight. You can also use the barrel to help push it out if it is difficult.
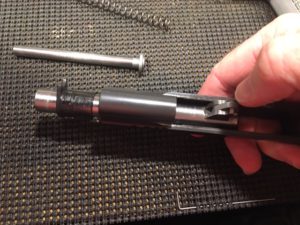
The barrel can now be removed out the front of the slide. You will need to flip the barrel lug forward so it will fit through the opening in the front of the slide.
You have now disassembled your Kimber 1911.
That is all there is to it. Now you can clean and lubricate each component. See How to Clean a Kimber 1911.
Firearms Legal Protection
from $9.95/month
FLP is highly regarded and recommended by some of the top names in the self defense firearms industry. Be sure to check them out before you make a decision.
For reassembly tutorial, see How to reassemble a 1911.
Kimber 1911 Disassembly Video
Please leave any questions or comments below, I would love to hear from you! I will answer every question.
Detail Stripping the Kimber Pro Carry II 1911 Pistol.: Ok first you are going to need a few things. You will need the takedown tool. You will also need something to grip with, I’m using self locking tweezers, but you could use hemostats, or if you are really adept with strong fingers, you can use regular tweezers. This is my own take on things nice Post
Dammy, thanks for your comment on my 1911 disassembly tutorial! thanks for the tip on the Kimber Pro Carry. I have a tutorial on that as well. what do you use the tweezers or hemostats for?
Dave
This was a great and simple to follow guide on how to dissemble a kimber 1911 pistol. You laid it all out clearly and showed examples that helped emphasize the various steps. This guide will be very useful for people like me and other that forgot how to disassemble their Kimbers.
I am going to try this out because i have all the instructions in place.
Thanks for this information.
Wealthfather, thanks for reading and commenting on my tutorial! It is pretty easy to disassemble a 1911 once you look at the steps and view the video.
Dave
Hi there Dave. This is just an excellent step by step process of disassembly of a Kimber 1911, with this step-by-step guide, I can say I will be able to disassemble a kimber 1911, I should be able to successfully disassembly it without anybody instructions. I hope to ready more post on guns and even rifle in the future.
Yormith96, thanks for the comment! I will be adding more tutorials as time permits on the disassembly, cleaning and maintenance of varoius firearms.
Dave
This is the reason I love the Internet – no matter what you want to learn to do, there’s always a pro who can show you exactly what you need to know. Thanks for posting such clear instructions, Dave!
I hadn’t heard that the five inch models are dubbed “Government” types. Good to know in case I stumble upon a weapon with that moniker.
Very helpful video. I thought the wealth of pictures you included was great, but the video is even better!
So, when that pin shot across the room on you… bet you were wide awake after that happened, eh?!! Lol
Keep up the good work. Appreciate your attention to detail. 😉
TJ, thanks for reading my tutorial and leaving a comment! I enjoyed writing the post and the added benefit of getting my Kimber cleaned in the process! Yeah, I was fortunate that when the plug shot across the room, i was able to hear where it landed and found it quickly!!
Dave
Nice article on how to Disassemble a Kimber 1911 with a 5″ barrel complete disassembly and field strip instructions. I must say a very well done job to you for posting this article. It so full of information on how to diassemble the 1911 gun.
I always have it in mind to have a gun for my self protection at home. But I will like to ask you to recommend the gun you think I can buy after going for how to shoot training.
ajibola40, thanks for the comment on my tutorial. I always prefer a revolver for home defense. A nice Smith and Wesson .357 Magnum with a 4″ barrel! That way, anyone in the house can use it. My personal choice for carry is a 1911, but others in my household do not train with a 1911 and prefer the ease of a revolver.
Dave
Hi Dave. Great field strip demonstration! I’m more of a revolver fan, but it’s interesting to learn more about magazine fed handguns. I can field strip an M16A2 rifle blindfolded, but never had the opportunity try it with a handgun. (With a little research, I found out that there are even magazine-fed revolvers. Sounds crazy to me, but then there’s the Dardick!)
From your demo, taking down the Kimber 1911 looks fairly simple.
I’ve heard that the Kimber 1911 doesn’t do well as a trade-in at some gun shops. Have you heard that?
JM80525,
Thanks for stopping by and leaving a comment! I also like revolvers. I have one for my home defense gun.
I may do a tutorial on cleaning a revolver if I can see if people are looking for that on the internet! I had not heard about any trade in issues with Kimber 1911 models, but then again I don’t plan on trading mine in. LOL.
Dave
This is a complete DIY approach to disassemble Kimber 1911. Your explanation is very straightforward, easy to understand even if you don’t own this exact gun. The pictures of each step goes a long way in the explanation. This is a nice article, I guess there is no need for a practical armorers class. Hahaha
Marshall, thank you for reading my tutorial and leaving a comment about disassembling a 1911. I am glad you found it clear and useful. I hope this helps everyone looking fo a quick primer so they can get their 1911 cleaned!
Dave
This is a nice post on what I would call a field strip, but for a complete disassembly, you need to take off the grips and show how to disassemble all the rest of the parts inside.
Mark, excellent point. I will make some changes or add more steps in the near future. Thanks for the correction!
Dave