The Type 3 Handgun Malfunction Drill
What is a Type 3 Handgun Malfunction?
The third firearm malfunction we will discuss is the “dreaded” type 3 malfunction, also known as a double feed, or “brass low”.
You can see the Type 1 Malfunction and Type 2 Malfunction here.
Further definitions of firearms malfunctions can be found on Wikipedia.
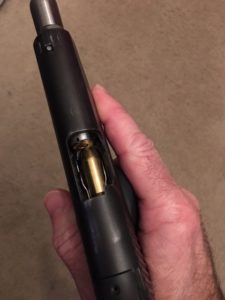
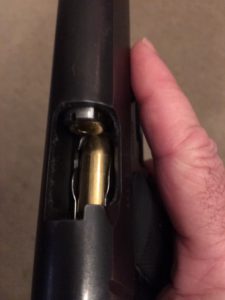
The Type 3 malfunction occurs when the firearm attempts to load a new cartridge into the chamber when it already has another cartridge, or more likely, spent brass in it.
This is the “dreaded” malfunction, also known as “the mother of all malfunctions” because it is the hardest and most time-consuming to clear. Some instructors will tell you that if you are in a real gunfight and you experience a type 3 malfunction, go for your back-up gun instead of trying to clear it! However, with practice, this can be accomplished in under 6 seconds!
This could be caused by a bad extractor, a damaged cartridge rim, or some other reason the spent brass was not ejected, and now the slide is trying to force another cartridge into the chamber when there is already one there.
In this situation, the action will be partially open, and if you look into the chamber you will see brass low inside.
This malfunction unfortunately cannot be fixed with a tap, rack procedure like the type 1 and the type 2 malfunctions.
This is because the tap, rack procedure will not remove what is likely a stuck cartridge or stuck brass in the chamber. Also, the slide will be almost all the way back already and there is some force from the recoil spring creating pressure against the rounds that are now stuck in the ejection port.
How to Clear a Type 3 Malfunction – The Drill Video
To clear the type 3 malfunction, you must unload the gun, clear the chamber and then reload the gun. The following drill will walk you through it.
There are a couple ways to do this, and I will explain both ways. The first way I am going to show you will work with any semi-automatic handgun, the second method may or may not work with your handgun due to the difficulty in removing the magazine when this condition exists.
Type 3 Malfunction Step-by-Step with Pictures
Here are the steps, and you can watch me in the video above to see how to execute the clearing of a type 3 malfunction.
You can also practice this drill at home using dry fire with dummy rounds or snap caps.
1. Dead Trigger. You will press the trigger but nothing happens (a dead trigger.) This is not enough information about the problem in order to resolve it quickly.
2. Look and Move. You will need to quickly tip the gun up so you can look into the ejection port and you will notice brass low in the port. While you are doing this you want to move to cover if you are in a real shooting situation, or if training simply take a step or two to the side as you look.

3. Check for a magazine. Using your support side hand you’ll quickly reach down to your gun belt and check to see if you have a spare magazine. If you do, you will be getting that in the future step, if you do not have one you’ll have to retain your existing magazine in the future step.
4. Lock the slide back. Once you have diagnosed that you have a type 3 malfunction, you will want to remove the magazine but first you must take your support side hand and lock the slide all the way to the rear. This step removes the pressure on the stuck cartridges so that the magazine can now be removed easily.
5. Remove the magazine. Using your firing hand thumb, press the magazine release and it will either drop out by itself or you may have to help it out with your support side finger. If step 3 revealed that you had an extra magazine, you can simply allow this magazine to fall to the ground. If you did not have an extra magazine you will need to remove this magazine and retain it, either with your firing side pinkie finger, shove it in a pocket or shove it in your arm pit so you can put it back in the magazine well in step 7. (I have included a video below to show the retention of the magazine with the support side pinkie finger.)
6. Rack, rack, rack. You will now take your support side hand and rack the slide firmly three times in order to remove any brass that is stuck in the chamber.
7. Load a magazine. If step three revealed that you had a magazine, index that magazine, bring it up to the gun and load it firmly into the magazine well. If you did not have a spare magazine, take the retaining magazine, index it, and insert it firmly into the magazine well.
8. Rack. Rack the slide to load a fresh cartridge, finger back on the trigger, assess the situation and decide whether to shoot or not.
Clearing a Type 3 Malfunction When You Do Not Have a Spare Magazine
In step 5, I mentioned retaining the magazine if you do not have a spare magazine. This is a skill that you definitely need to practice.
When you are training on the range, or at Front Sight Firearms Training Institute, you will have a spare magazine or two (or 4, if you are training with a 1911!) in a holster on your belt.
Let’s face it, if you are actually in a fire fight and have a type 3 malfunction, unless you are Law Enforcement or Keanu Reeves in a John Wick movie, you are not likely to have a spare magazine on your belt.
In the video you will see me remove the magazine and place it under the pinkie of my support hand while I rack the slide 3 times, then put it back in the gun. It is a simple maneuver, but needs to be practiced to become smooth and fast.
If placing the magazine under a pinkie is not for you, you can place it anywhere it will remain secure while you rack the slide such as a pocket or under your arm.
Type 3 Malfunction without a Spare Magazine Video
Another Method to Clear the Type 3 Malfunction.
The second method that can be used with some handguns is more or less the same, except you would skip Step 4 above.
This will make it harder to remove the magazine, but in most guns, you will be able to grasp the bottom of the magazine and “rip” it out. If you cannot quickly and easily get a good hold of the magazine with your support side hand, you may not be able to use this technique.
There is some controversy surrounding the different techniques.
Determine which of these two techniques works best with your particular handgun. Then practice, practice, practice until this clearance becomes second nature. You can use a timer, or you can download this inexpensive app that will help you increase your speed. Dry Practice Drill.
Also see Tactical Reload Drill and Emergency Reload here.
Cheers to that great tutorial! My brother has this exact gun and sometimes has trouble with it malfunctioning. I don’t have as much gun skills as he does but I’m pretty sure he knows how to properly handle this gun if it malfunctions. I actually think he does it slightly different. I will send him here so he can share his method! Thanks, I learnt a lot!
Thanks for the comment, Brandon! Yes, it is good to learn how to clear any malfunctions that may occur. If you are going to carry a gun, you need to train with it and learn how it works and how to fix it when it malfunctions. Some of the methods are slightly different, but use whatever works for your particular weapon.
Dave
Hey Dave,
A lot of people don’t realize that guns and firearms can malfunction all the time. I don’t remember who told me this, but someone told me that older guns have more problems than newer handguns. I guess it would make sense, but I don’t know how accurate it is. What do you think?
I’m interested in getting a handgun soon. My friend let me fire his the other day at the gun range. What gun manufactures have the least malfunction rate? I am guessing there is a difference between each manufacture.
Garen, thanks for your comment. Yes, modern guns for the most part have low malfunction rates, but malfunctions can be caused by the shooter as well. If you don’t hold the gun properly, the movement of the slide can be affected, causing a Failure to feed. A gun that is not properly cleaned and lubed can also introduce a malfunction, regardless of how well the firearm is made. It is critical to properly maintain and practice with any Handgun. See my article on Cleaning a 1911 for cleaning tips.
Dave
Very good and informative instruction on clearing a handgun malfunction. I don’t know if I will ever be in a situation where I am in a handgun fight, but this will be potentially life-saving in that situation.
Your video was better for me than your written instructions. I guess I am a visual learner. The video was very well done.
Thanks,
Ellen
Ellen, thanks for reading and commenting! Yes, clearing a malfunction is an important skill to learn for anyone who may be carrying a semiautomatic handgun or even shooting one at the range. Even on the range, it can be dangerous for someone to try to clear a jam if they do not know what they are doing!
Dave
A very informative article and one that should be read by any gun owner as one day it could save your life.
I didn’t know there were different types of malfunctions, are any types of malfunctions that are potentially dangerous when clearing the chamber?
It’s great that you are providing the knowledge for dealing with these malfunctions so users are able to practice fixing any potential problems
Darren, thank you for stopping by and reading my article on clearing gun malfunctions. Yes, clearing a malfunction can be dangerous if you do not know what you’re doing, how to handle the gun, and where it is pointing as you’re dealing with the problem. This is why I highly recommend professional training so you can become safe, confident and proficient in these types of manipulations.
A great place to go for this type of training is Front Sight Firearms Training Institute .
Dave